> ## Documentation Index
> Fetch the complete documentation index at: https://docs.probaseapp.com/llms.txt
> Use this file to discover all available pages before exploring further.
# Adding new customers
> Create customer profiles
## Ways to add customers
You can add customers to Probase in several ways:
1. **Quick Actions (Job creation)** - Create customer + property + service + appointment all at once using the floating action button. See [Creating jobs](/getting-started/creating-jobs).
2. **Add customers manually** - Enter customer information one at a time through the customer creation form (described below).
3. **Import in bulk** - Upload a spreadsheet, PDF, or other file and let AI extract your customer list automatically. See [Importing customers](/customers/importing-customers).
4. **Let Probase do it for you** - Early Probase users can email their existing customer data to the Probase team and have it set up within 24 hours. See [Importing customers](/customers/importing-customers) for details.
5. **Let customers reach out to you** - Share your branded contact form so prospects can submit their own details, which arrive as new leads automatically. See [Your contact form](/customers/contact-form).
If you need to get a customer scheduled quickly, use the [Job creation feature](/getting-started/creating-jobs). If you're switching from another app and have an existing customer list, use [bulk import](/customers/importing-customers). For adding customers one at a time, use the manual approach below.
## Add a customer manually
You can open the customer form in several ways:
* Click the Quick Actions button (the **+** floating button in the bottom-right), then select **New Customer**, OR
* Click **Customers** in the sidebar and tap the **Add customer** button in the top-right of the page header, OR
* If you don't have any customers yet, an **Add customer** button also appears in the middle of the page above an empty state ("No customers added yet"). Tap it to open the form, OR
* If your **Schedule** is empty and you haven't added any customers, the **Add a customer** button there opens the same form. See [Weekly calendar](/scheduling/weekly-schedule#when-your-schedule-is-empty).
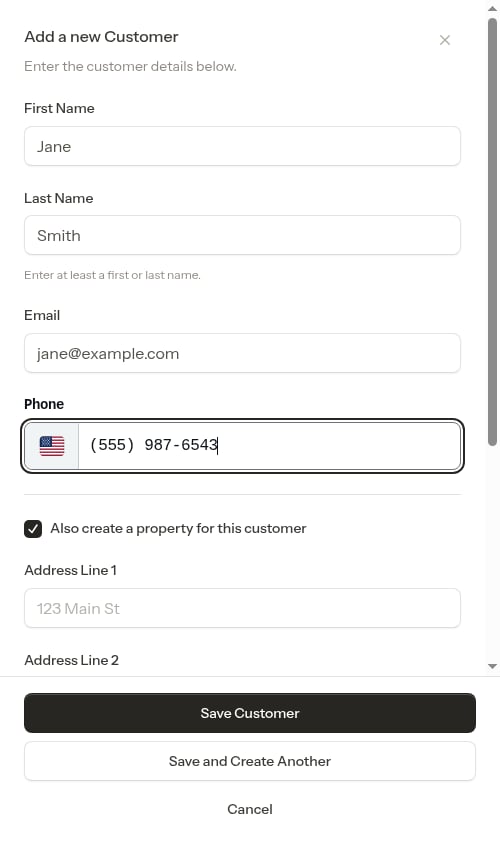
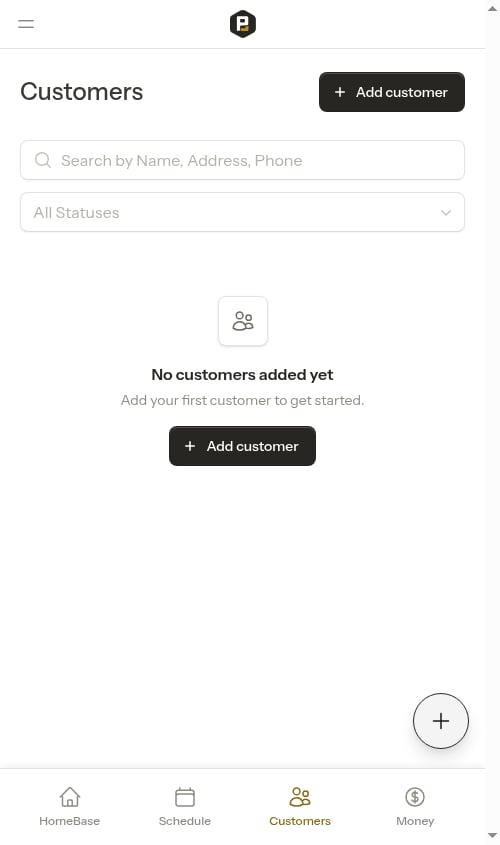 Enter the customer's basic information:
* **First name** and **Last name** — enter at least one of the two. You can save a customer with just a first name, just a last name (handy for a company or a contact you only know by surname), or both. If you leave both blank, you'll see "Enter at least a first or last name." and the customer won't be saved.
* **Phone number** (optional) — capture it so you can reach customers about scheduled work and send them payment links by SMS, but it's no longer required to save.
* **Email address** (optional, but recommended for sending payment links)
The phone field automatically formats your entry as you type. Enter a 10-digit phone number and it will be formatted as (555) 555-5555.
Enter the customer's basic information:
* **First name** and **Last name** — enter at least one of the two. You can save a customer with just a first name, just a last name (handy for a company or a contact you only know by surname), or both. If you leave both blank, you'll see "Enter at least a first or last name." and the customer won't be saved.
* **Phone number** (optional) — capture it so you can reach customers about scheduled work and send them payment links by SMS, but it's no longer required to save.
* **Email address** (optional, but recommended for sending payment links)
The phone field automatically formats your entry as you type. Enter a 10-digit phone number and it will be formatted as (555) 555-5555.
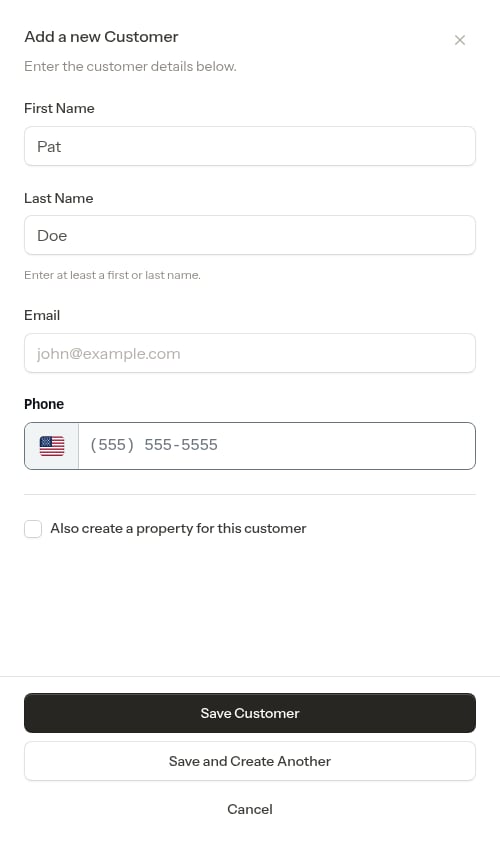
 You can also save a customer with just a name — leave the phone and email blank and uncheck the property box to capture a quick contact or lead.
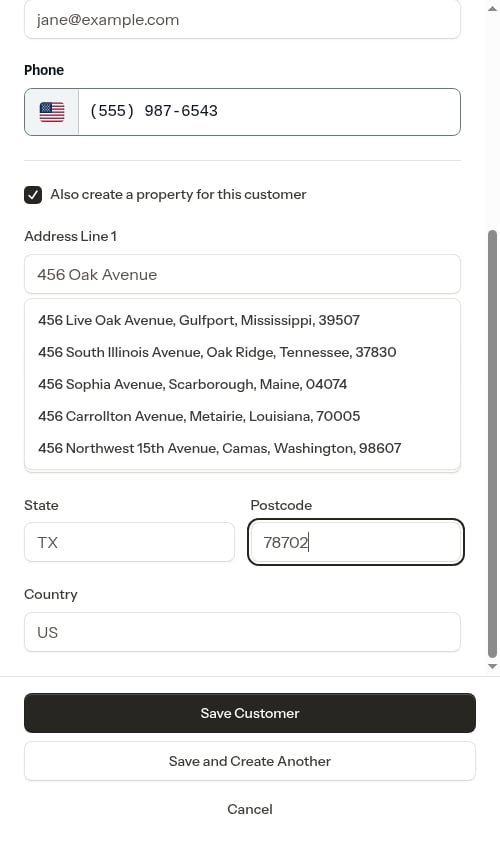
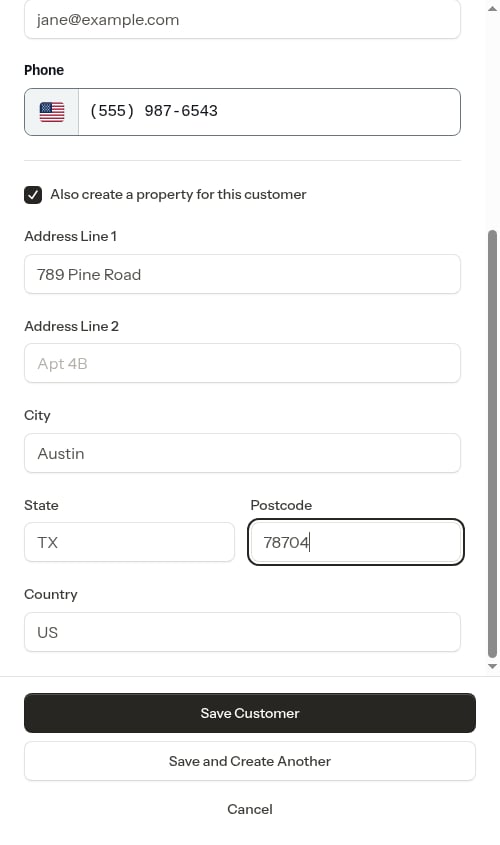
 The **Also create a property for this customer** checkbox is turned on by default, since most customers are added so you can schedule work for them — which needs a property address. Leave it checked to add the address now, or uncheck it if you only want to capture a contact for now (you can add a property later from the customer's page).
When checked, you'll see address fields to fill in:
* **Address Line 1** — Start typing and address suggestions will appear. Select one to auto-fill the city, state, and postcode fields automatically.
* **Address Line 2** (optional) — Apartment, suite, or unit number
* **City**, **State**, **Postcode** — Filled in automatically when you select an address suggestion, or enter manually
The **Also create a property for this customer** checkbox is turned on by default, since most customers are added so you can schedule work for them — which needs a property address. Leave it checked to add the address now, or uncheck it if you only want to capture a contact for now (you can add a property later from the customer's page).
When checked, you'll see address fields to fill in:
* **Address Line 1** — Start typing and address suggestions will appear. Select one to auto-fill the city, state, and postcode fields automatically.
* **Address Line 2** (optional) — Apartment, suite, or unit number
* **City**, **State**, **Postcode** — Filled in automatically when you select an address suggestion, or enter manually
 At the bottom of the form you have two save options:
* **Save Customer** — saves the customer and takes you to their details page. If you added a property, the new property appears in the Properties section of that page so you can pick up where you left off.
* **Save and Create Another** — saves the customer and immediately clears the form for the next one, without closing the window. The address checkbox stays checked so you can keep entering customers and their properties back-to-back. Use this when you have several customers to enter in one sitting.
At the bottom of the form you have two save options:
* **Save Customer** — saves the customer and takes you to their details page. If you added a property, the new property appears in the Properties section of that page so you can pick up where you left off.
* **Save and Create Another** — saves the customer and immediately clears the form for the next one, without closing the window. The address checkbox stays checked so you can keep entering customers and their properties back-to-back. Use this when you have several customers to enter in one sitting.
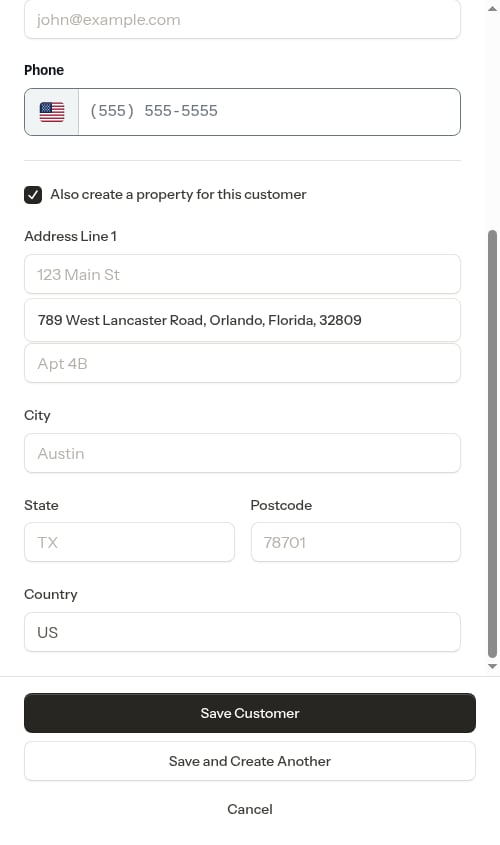 While the customer is being saved, the form fields and buttons are locked and the button you tapped shows **Saving…** — so you can't accidentally submit twice. It unlocks automatically once the save finishes. If anything's missing (like leaving both names blank), the form re-enables with the error shown inline so you can fix it.
 ## Your first customer
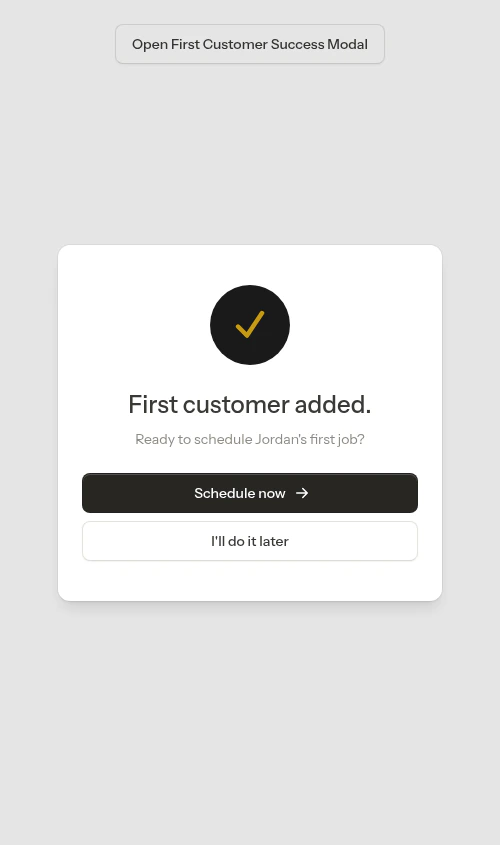
The very first time you add a customer to your account, Probase shows a quick celebration once the customer is saved:
> **First customer added.**
> Ready to schedule their first job?
## Your first customer
The very first time you add a customer to your account, Probase shows a quick celebration once the customer is saved:
> **First customer added.**
> Ready to schedule their first job?
 From here you can:
* **Schedule now** — jumps straight into the job creation flow with this customer already selected, so you can book their first appointment right away. See [Creating jobs](/getting-started/creating-jobs).
* **I'll do it later** — closes the message and drops you back where you were (the customer's page, or a fresh form if you used Save and Create Another).
This celebration only appears once — when you add the first customer on a brand-new account. You won't see it again for later customers.
## Viewing a customer
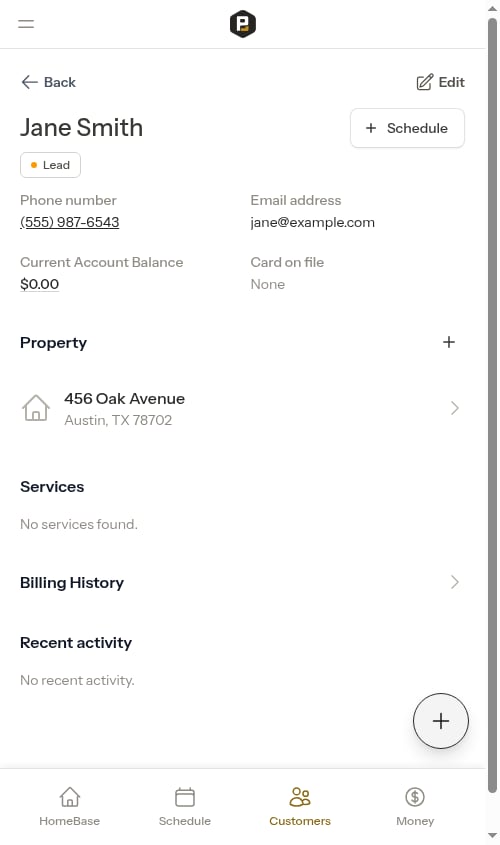
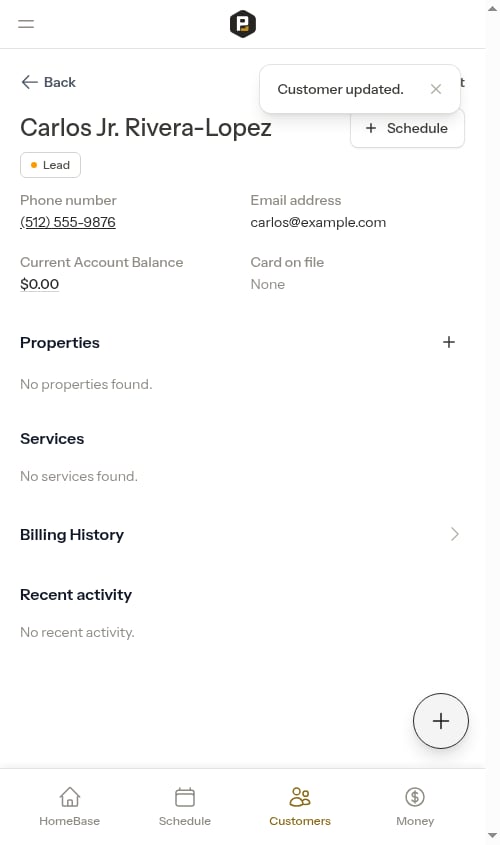
After creating a customer, you'll see the customer detail page. At the top is a summary card showing:
* **Phone number** — tap to call directly
* **Email address** — tap to open your email app
* **Current Account Balance** — tap to open the full billing history page
* **Card on file** — Probase does not store saved cards, so this currently always reads "None"
From here you can:
* **Schedule now** — jumps straight into the job creation flow with this customer already selected, so you can book their first appointment right away. See [Creating jobs](/getting-started/creating-jobs).
* **I'll do it later** — closes the message and drops you back where you were (the customer's page, or a fresh form if you used Save and Create Another).
This celebration only appears once — when you add the first customer on a brand-new account. You won't see it again for later customers.
## Viewing a customer
After creating a customer, you'll see the customer detail page. At the top is a summary card showing:
* **Phone number** — tap to call directly
* **Email address** — tap to open your email app
* **Current Account Balance** — tap to open the full billing history page
* **Card on file** — Probase does not store saved cards, so this currently always reads "None"
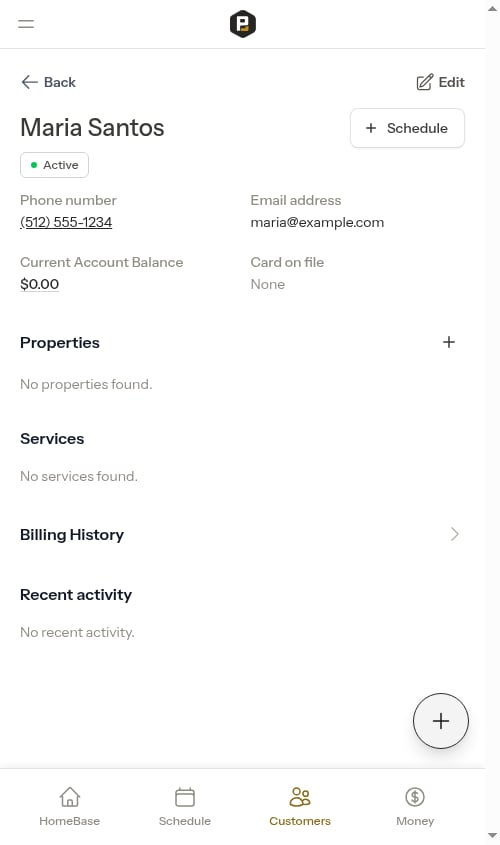 Below the top card are sections for **Properties**, **Services**, a **Billing History** link that opens the full billing history page, and **Recent Activity**.
If the customer has a single property with notes saved on it, those notes appear inline under the Properties section so you can see them at a glance. For customers with multiple properties, each property row shows a note count.
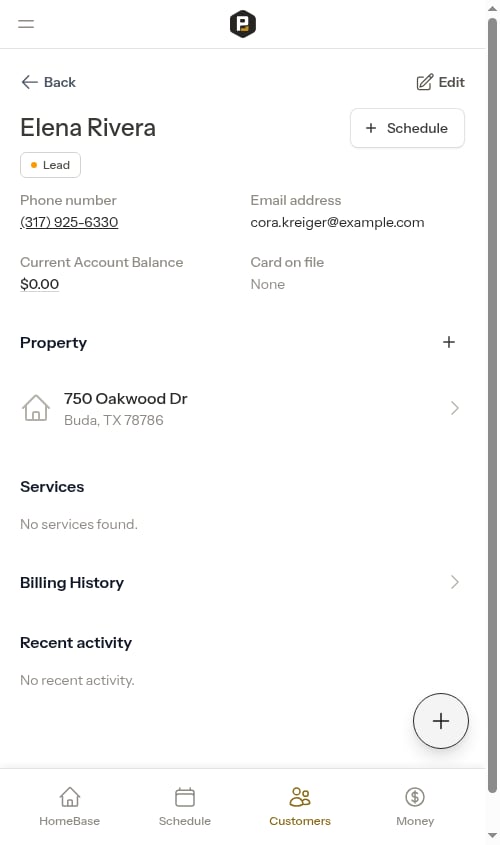
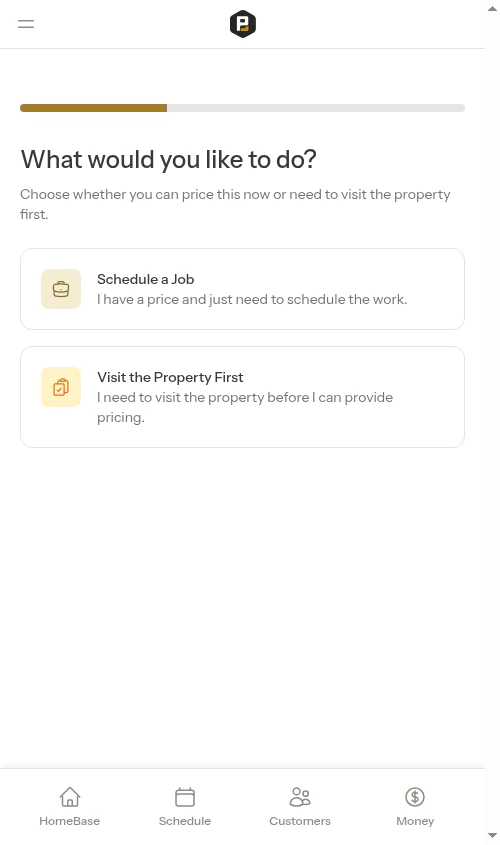
From the customer page you can also tap **Schedule** in the page header to start a new job for this customer. The job creation wizard opens with the customer already filled in, so you go straight to choosing a property and configuring the service. See [Creating jobs](/getting-started/creating-jobs) for the full flow.
Below the top card are sections for **Properties**, **Services**, a **Billing History** link that opens the full billing history page, and **Recent Activity**.
If the customer has a single property with notes saved on it, those notes appear inline under the Properties section so you can see them at a glance. For customers with multiple properties, each property row shows a note count.
From the customer page you can also tap **Schedule** in the page header to start a new job for this customer. The job creation wizard opens with the customer already filled in, so you go straight to choosing a property and configuring the service. See [Creating jobs](/getting-started/creating-jobs) for the full flow.
 ## Edit customer information
Go to **Customers** and click on the customer's name.
Click the **Edit** button on the customer details page. The edit form opens as a modal.
## Edit customer information
Go to **Customers** and click on the customer's name.
Click the **Edit** button on the customer details page. The edit form opens as a modal.
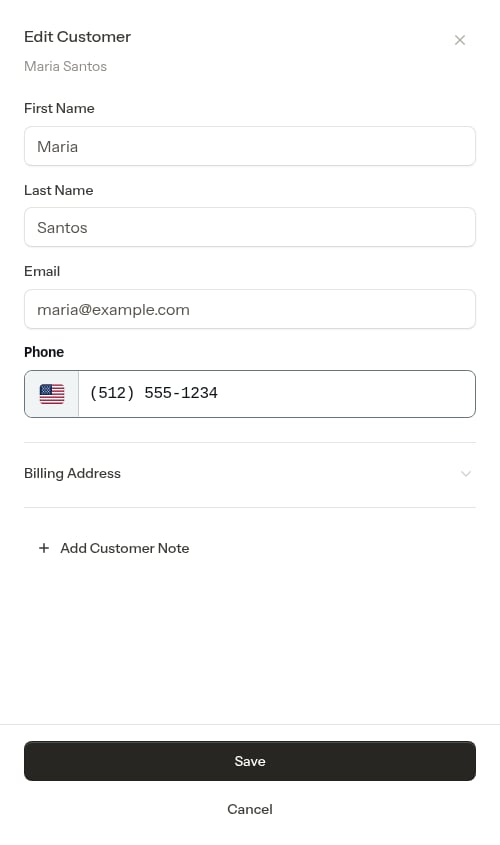 Make your changes to:
* First name
* Last name
* Email address
* Phone number (automatically formatted as you type)
The edit page also includes a **Billing Address** section. Adding a billing address will display the customer's address on their invoices. Fill in Address Line 1, Address Line 2 (optional), City, State, ZIP Code, and Country. Start typing in the Address Line 1 field and suggestions will appear — selecting one auto-fills the city, state, ZIP code, and country automatically.
Make your changes to:
* First name
* Last name
* Email address
* Phone number (automatically formatted as you type)
The edit page also includes a **Billing Address** section. Adding a billing address will display the customer's address on their invoices. Fill in Address Line 1, Address Line 2 (optional), City, State, ZIP Code, and Country. Start typing in the Address Line 1 field and suggestions will appear — selecting one auto-fills the city, state, ZIP code, and country automatically.
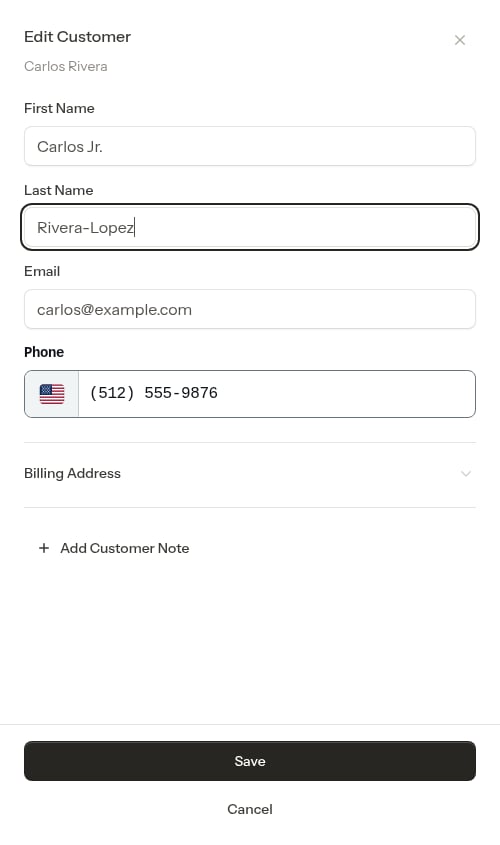 Click **Save** to update the customer information.
 ## Search and filter customers
### Search
Use the search bar at the top of the **Customers** page to find customers by name, address, or phone number. The search also matches on email and city/zip. Click on any customer in the results to view their profile.
### Filter by status
Use the **All Statuses** dropdown to narrow down your customer list. You can select one or more statuses at the same time — for example, select both **Lead** and **Inactive** to see customers who aren't currently active. Clear all selections to return to the full list.
Available statuses:
* **Lead** — Customers with pending inquiries but no active services
* **Active** — Customers with at least one active service
* **Recent** — Customers who had work done in the last 30 days but no active services
* **Inactive** — Past customers with no active services and no recent activity
See [Understanding customer status](/customers/customer-status) for details on what each status means and how it's calculated.
## Search and filter customers
### Search
Use the search bar at the top of the **Customers** page to find customers by name, address, or phone number. The search also matches on email and city/zip. Click on any customer in the results to view their profile.
### Filter by status
Use the **All Statuses** dropdown to narrow down your customer list. You can select one or more statuses at the same time — for example, select both **Lead** and **Inactive** to see customers who aren't currently active. Clear all selections to return to the full list.
Available statuses:
* **Lead** — Customers with pending inquiries but no active services
* **Active** — Customers with at least one active service
* **Recent** — Customers who had work done in the last 30 days but no active services
* **Inactive** — Past customers with no active services and no recent activity
See [Understanding customer status](/customers/customer-status) for details on what each status means and how it's calculated.