> ## Documentation Index
> Fetch the complete documentation index at: https://docs.probaseapp.com/llms.txt
> Use this file to discover all available pages before exploring further.
# Creating jobs
> Create confirmed work with a multi-step wizard for customers, properties, and services
## What is a job?
A "job" in Probase is confirmed work that's ready to schedule and perform. Jobs are created through a guided multi-step wizard that helps you:
* Select or create a customer
* Select or create a property address
* Configure service details (pricing, billing, frequency)
* Set the start date so the visit schedule is created automatically
**Jobs vs Quotes and Assessments:** Jobs are for confirmed work where you're ready to start immediately. If you need customer approval first, use the quote wizard to create a Quote. If you need to visit the property to evaluate needs first, create an Assessment. See [Creating quotes and assessments](/customers/creating-quotes).
## When to use job creation
Use the job creation wizard when:
* **Confirmed work** - Customer has already agreed to the service and pricing
* **Quick setup** - You want to go from "new customer" to "scheduled appointment" in one flow
* **No approval needed** - Work doesn't require a formal quote or on-site assessment first
* **Standard services** - You know the pricing and scope upfront without needing a site visit
## How to create a job
The job creation wizard guides you through a simple multi-step process:
Click **New Job** from the dashboard, Quick Actions menu (bottom-right floating button), or from a customer/property page.
If you access the wizard from a customer or property page, those steps will be pre-filled and skipped, making the process even faster.
The wizard asks what you want to do:
* **Schedule a Job** - Create confirmed work ready to perform
* **Visit the Property First** - Redirects to the quote creation wizard to create an Assessment
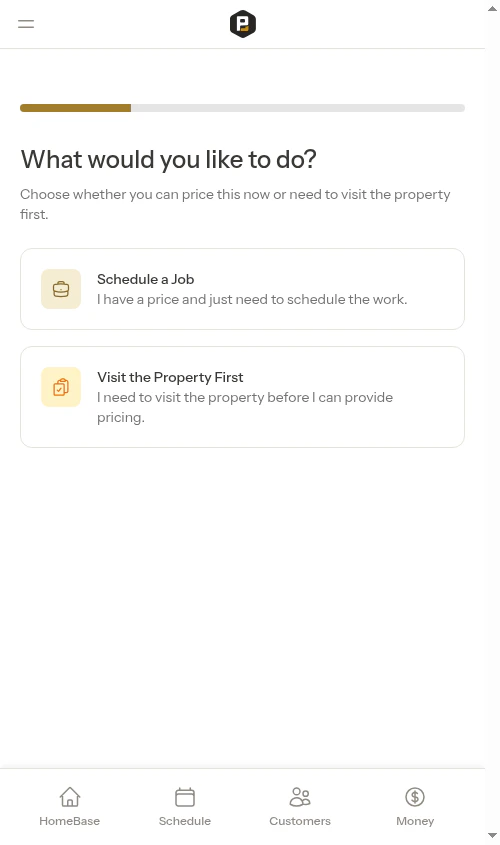 Select **Schedule a Job** to continue with job creation.
If you select "Visit the Property First", you'll be redirected to create an Assessment service instead. See [Creating quotes and assessments](/customers/creating-quotes) for that workflow.
Select **Schedule a Job** to continue with job creation.
If you select "Visit the Property First", you'll be redirected to create an Assessment service instead. See [Creating quotes and assessments](/customers/creating-quotes) for that workflow.
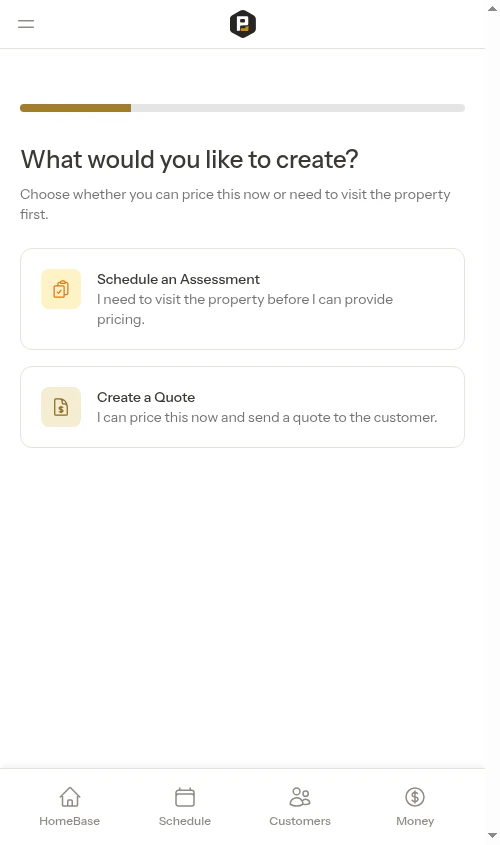 Choose an existing customer or create a new one (skip this step if you came from a customer page).
The customer step shows your full customer list in alphabetical order. The header is sticky as you scroll, so the **Back** button, **New customer** button, and search bar stay reachable.
Choose an existing customer or create a new one (skip this step if you came from a customer page).
The customer step shows your full customer list in alphabetical order. The header is sticky as you scroll, so the **Back** button, **New customer** button, and search bar stay reachable.
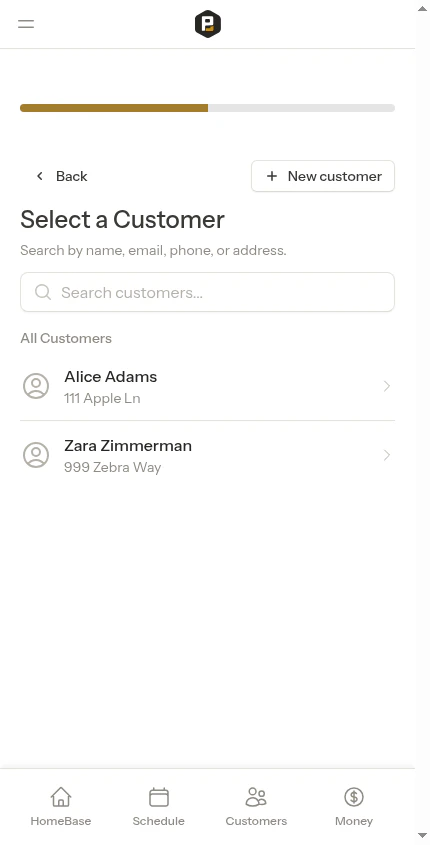 **To select an existing customer:**
1. Scroll through the **All Customers** list — more customers load automatically as you reach the bottom
2. Or type into the search box to filter by name, email, phone, or address
3. Tap the customer to select them
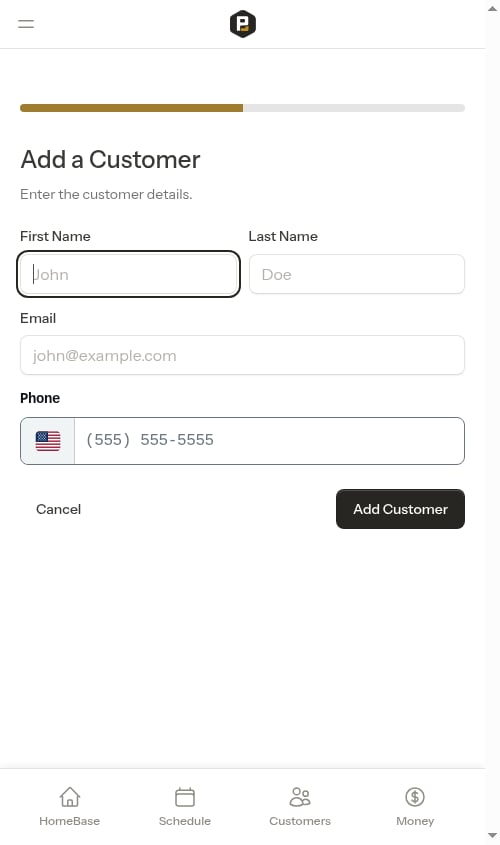
**To create a new customer:**
1. Tap **+ New customer** in the top-right of the header
2. Fill in their information:
* First Name (required)
* Last Name (required)
* Email (optional, but helpful for payment links)
* Phone (optional, but helpful for notifications)
3. Click **Add Customer**
**To select an existing customer:**
1. Scroll through the **All Customers** list — more customers load automatically as you reach the bottom
2. Or type into the search box to filter by name, email, phone, or address
3. Tap the customer to select them
**To create a new customer:**
1. Tap **+ New customer** in the top-right of the header
2. Fill in their information:
* First Name (required)
* Last Name (required)
* Email (optional, but helpful for payment links)
* Phone (optional, but helpful for notifications)
3. Click **Add Customer**
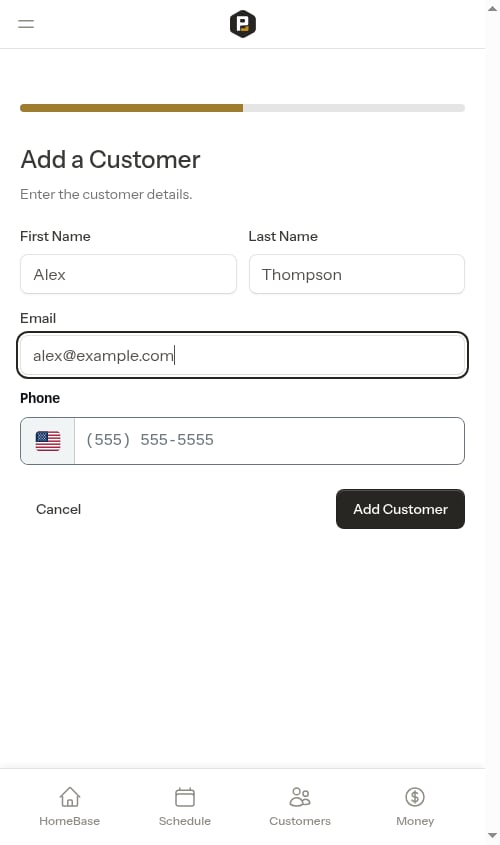 The wizard automatically moves to the next step after you select or create a customer.
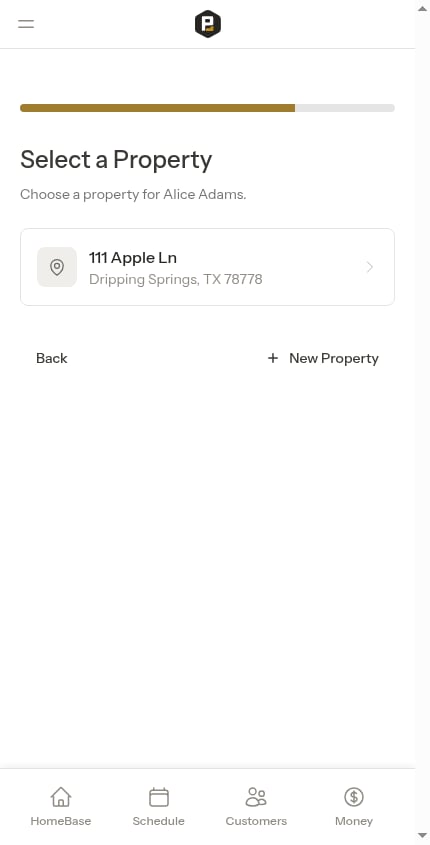 Choose which property address the work is for, or create a new one (skip this step if you came from a property page).
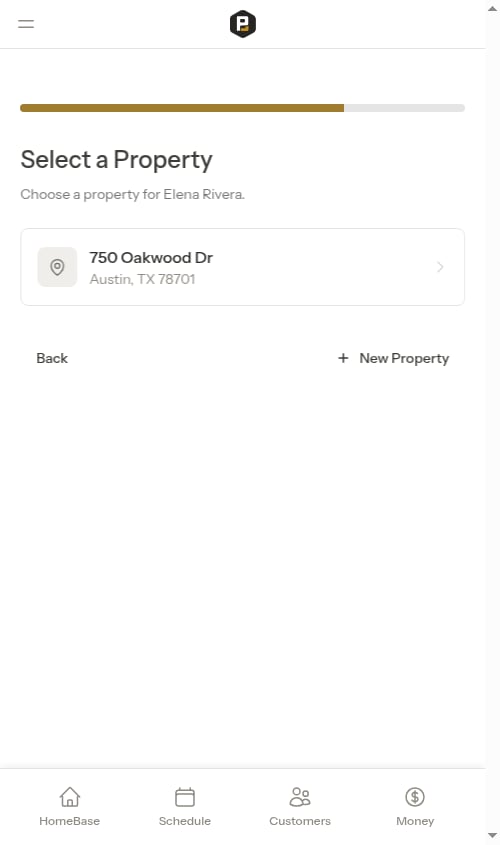 **To select an existing property:**
* Click on any of the customer's properties shown in the list
**To create a new property:**
1. Click **New Property**
2. Fill in the address:
* **Address Line 1** (required) — Start typing and address suggestions will appear. Select one to auto-fill the city, state, and postcode fields automatically.
* **Address Line 2** (optional) — Apartment, suite, or unit number
* **City**, **State**, **Postcode** — Filled in automatically when you select an address suggestion, or enter manually
3. Click **Add Property**
**To select an existing property:**
* Click on any of the customer's properties shown in the list
**To create a new property:**
1. Click **New Property**
2. Fill in the address:
* **Address Line 1** (required) — Start typing and address suggestions will appear. Select one to auto-fill the city, state, and postcode fields automatically.
* **Address Line 2** (optional) — Apartment, suite, or unit number
* **City**, **State**, **Postcode** — Filled in automatically when you select an address suggestion, or enter manually
3. Click **Add Property**
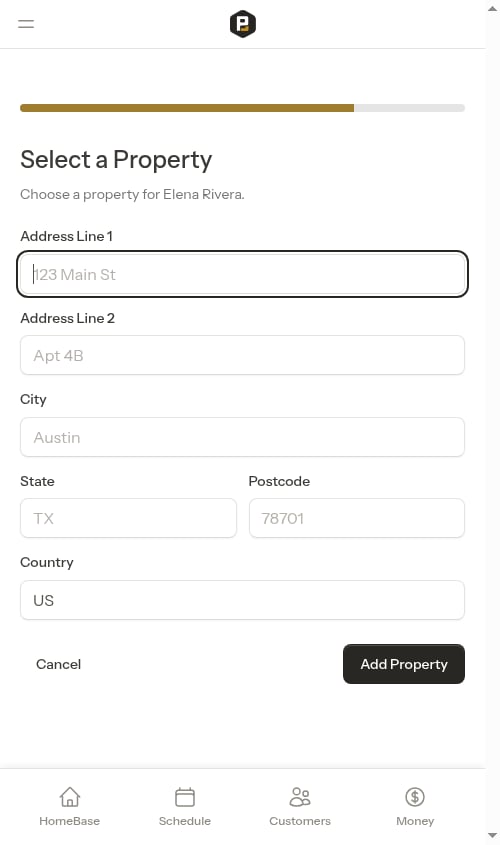
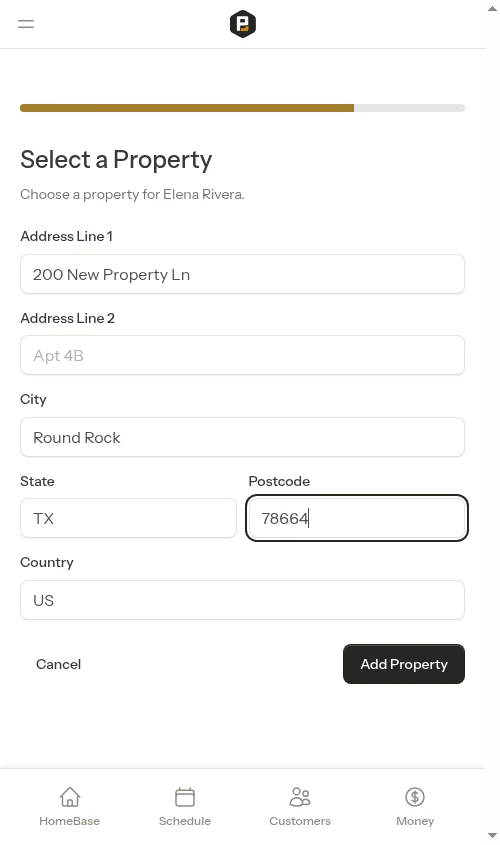 The property address is automatically geocoded for accurate mapping and route optimization.
Fill in the job details:
The property address is automatically geocoded for accurate mapping and route optimization.
Fill in the job details:
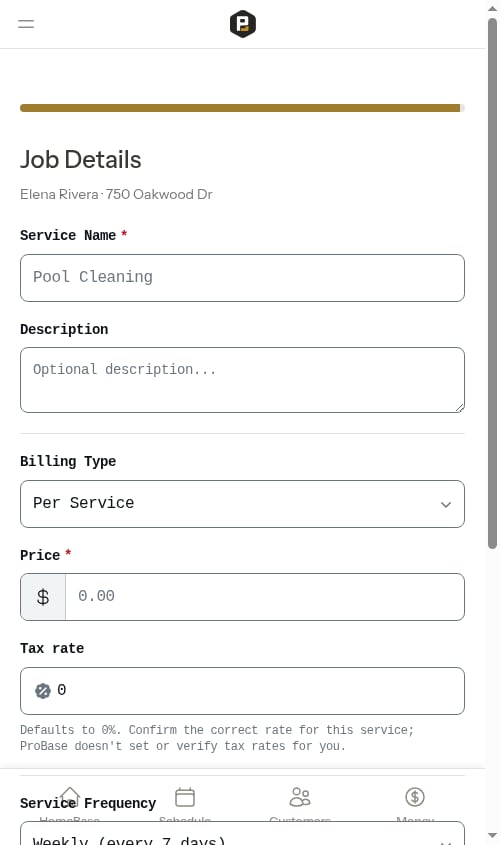 **Service Information:**
* **Service Name** (required) - What you're doing (e.g., "Weekly Pool Cleaning"). If you've built a [service catalog](/getting-started/service-catalog), a saved-service dropdown lets you pick a service and have the name, description, price, and billing details filled in for you. When your catalog spans more than one trade, the dropdown groups the options under industry headers so they're easier to find.
* **Description** (optional) - Details about what's included
* **Industry** (optional) - The trade this job belongs to, such as Pool or Lawn. If you pick a service from your catalog, the industry is filled in for you from that service. This field only appears if you've set up more than one trade; if you only do one trade, ProBase fills it in automatically and keeps the field out of your way. See [Industries (trades)](/getting-started/industries) for what tagging a job's trade unlocks.
**Pricing:**
* **Price** (required) - What the customer pays per service or per billing period
* **Tax Rate** (required) - Tax percentage (e.g., 8.25 for 8.25% tax)
**Billing Configuration:**
* **Billing Type** - Per Service or Subscription
* **Per Service** - Customer billed each time work is completed
* **Subscription** - Customer billed on recurring schedule regardless of visits
* **Billing Interval** (subscription only) - Weekly, Monthly, or Annual
For subscription services, Probase automatically uses the day you create the service as the recurring billing day — there's no extra input to fill in. If you create a monthly subscription on the 7th, future charges land on the 7th of each month; weekly subscriptions repeat on that weekday; annual subscriptions repeat on the same day of the year.
**Service Frequency:**
* **Service Frequency** - How often work is performed
* One-time (0 days)
* Weekly (7 days)
* Bi-weekly (14 days)
* Monthly (28 days)
**Schedule:**
* **Start Date** (required) — When the first visit happens. Defaults to tomorrow; pick any date today or later.
* **End Date** (optional, recurring services only) — When the recurring schedule should stop. Leave it blank to run for one year from the start date.
**Service Information:**
* **Service Name** (required) - What you're doing (e.g., "Weekly Pool Cleaning"). If you've built a [service catalog](/getting-started/service-catalog), a saved-service dropdown lets you pick a service and have the name, description, price, and billing details filled in for you. When your catalog spans more than one trade, the dropdown groups the options under industry headers so they're easier to find.
* **Description** (optional) - Details about what's included
* **Industry** (optional) - The trade this job belongs to, such as Pool or Lawn. If you pick a service from your catalog, the industry is filled in for you from that service. This field only appears if you've set up more than one trade; if you only do one trade, ProBase fills it in automatically and keeps the field out of your way. See [Industries (trades)](/getting-started/industries) for what tagging a job's trade unlocks.
**Pricing:**
* **Price** (required) - What the customer pays per service or per billing period
* **Tax Rate** (required) - Tax percentage (e.g., 8.25 for 8.25% tax)
**Billing Configuration:**
* **Billing Type** - Per Service or Subscription
* **Per Service** - Customer billed each time work is completed
* **Subscription** - Customer billed on recurring schedule regardless of visits
* **Billing Interval** (subscription only) - Weekly, Monthly, or Annual
For subscription services, Probase automatically uses the day you create the service as the recurring billing day — there's no extra input to fill in. If you create a monthly subscription on the 7th, future charges land on the 7th of each month; weekly subscriptions repeat on that weekday; annual subscriptions repeat on the same day of the year.
**Service Frequency:**
* **Service Frequency** - How often work is performed
* One-time (0 days)
* Weekly (7 days)
* Bi-weekly (14 days)
* Monthly (28 days)
**Schedule:**
* **Start Date** (required) — When the first visit happens. Defaults to tomorrow; pick any date today or later.
* **End Date** (optional, recurring services only) — When the recurring schedule should stop. Leave it blank to run for one year from the start date.
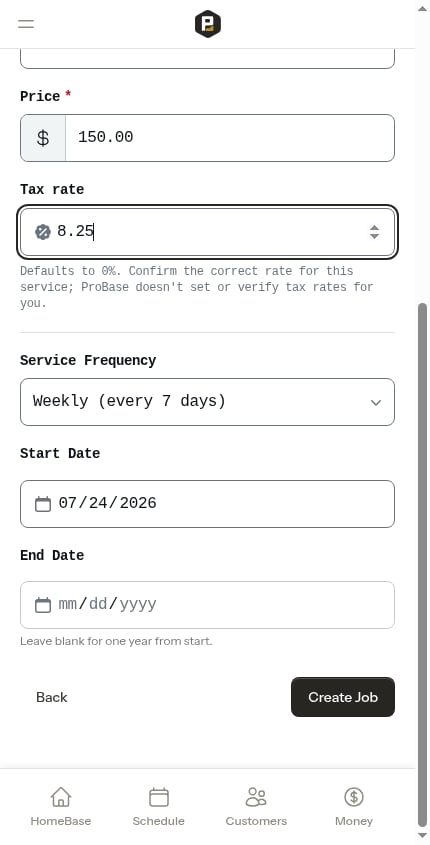 Jobs are created with "Active" status, meaning they're ready to perform immediately.
See [Understanding billing types](/billing/one-time-vs-subscription) for details on per-service vs subscription billing.
Click **Create Job** to save everything.
Jobs are created with "Active" status, meaning they're ready to perform immediately.
See [Understanding billing types](/billing/one-time-vs-subscription) for details on per-service vs subscription billing.
Click **Create Job** to save everything.
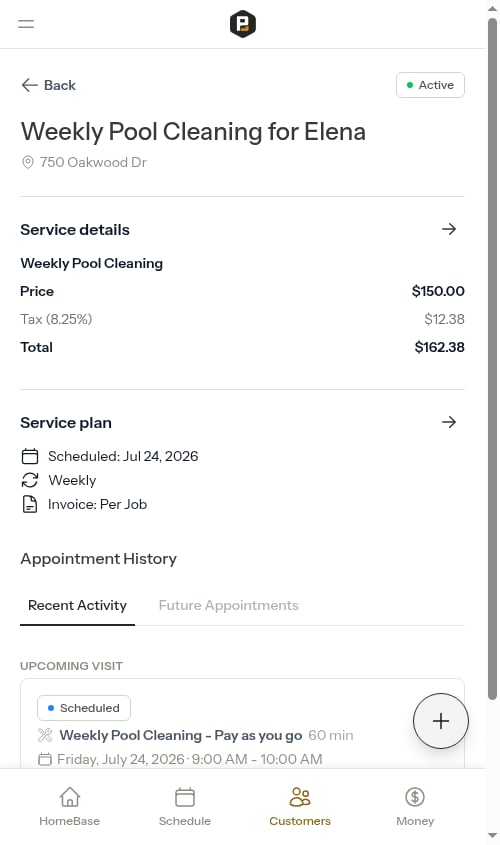 You're redirected to the service details page where you can see the new job and its appointments.
For **recurring services**, Probase pre-schedules the entire chain of future visits at once — from your start date through the end date (or one year out if you left it blank). For **one-time services**, a single appointment is created on the start date. See [How recurring visits are scheduled](/scheduling/future-visits) to learn how the visit chain works.
New appointments don't have a crew assigned yet (on single-crew teams they're assigned to your only crew automatically). Assign crews from the appointment detail page, the [Jobs without assigned crew](/scheduling/jobs-without-assigned-crew) list, or the calendar — and you can apply a crew to every future visit at once.
## Quick job creation shortcuts
The wizard skips steps automatically when you already have context:
**From a customer page:**
Clicking **New Job** from a customer's page automatically pre-fills the customer and skips the customer selection step, jumping directly to property selection.
**From a property page:**
Clicking **New Job** from a property's page automatically pre-fills both the customer and property, skipping those steps and taking you directly to the job details form.
These shortcuts happen automatically — no extra steps required.
## Billing type options
When creating a job, you'll choose how the customer is billed:
### Per Service billing
* Customer is charged each time an appointment is completed
* Best for one-time jobs or pay-per-visit arrangements
* Billing line items are created automatically after appointment completion
### Subscription billing
* Customer pays a flat rate on a schedule (weekly, monthly, or annual)
* Best for recurring flat-rate plans
* Choose the billing interval — the billing day is set automatically from the date you create the service
* Billing charges are created **automatically** on each upcoming billing date — Probase shows you the upcoming billing dates in the service details
See [Per-Service vs Subscription billing](/billing/one-time-vs-subscription) for a detailed comparison.
## What happens after creating a job
After you click **Create Job**, Probase automatically:
1. **Creates the customer** (if new) - Adds them to your customer list with all contact information
2. **Creates the property** (if new) - Links it to the customer with the full address
3. **Geocodes the property** - Places it on the map for accurate route planning and directions
4. **Creates the job service** - Sets up the job with "Active" status and all billing details
5. **Syncs with Stripe** (if connected) - Creates the customer in Stripe for payment processing
6. **Schedules the visits** - Creates the appointment on your start date and, for recurring services, pre-schedules the whole future chain through the end date (or one year out)
7. **Optimizes routes** (if enabled and a crew is assigned) - Automatically reorders the crew's appointments for efficiency
You're redirected to the service details page where you can:
* View all job details and appointments
* Assign crews and adjust the schedule
* Add notes or photos to the service
* Complete appointments and add service records
* Share payment links with the customer for billing
## Choosing between Jobs, Quotes, and Assessments
**Create a Job when:**
* Work is confirmed and doesn't need approval
* You know the pricing and scope
* Customer has already agreed to the service
* You're ready to schedule and start immediately
**Create a Quote when:**
* You can quote without visiting the property first
* Work needs customer approval before starting
* You want a formal acceptance workflow
* See [Creating quotes and assessments](/customers/creating-quotes)
**Create an Assessment when:**
* You need to visit the property before providing accurate pricing
* The scope is uncertain and needs evaluation
* You'll create a quote after the site visit
* See [Creating quotes and assessments](/customers/creating-quotes)
The workflow: Assessment → Quote → Job. But if work is already confirmed, skip straight to Job creation.
## Next steps
After creating jobs:
* [View your schedule](/scheduling/weekly-schedule) to see all appointments
* [Optimize routes](/routes/optimizing-routes) for efficient daily schedules
* [Complete appointments](/routes/completing-jobs) and track service records
* [Send payment links](/billing/sending-payment-links) to collect payment
You're redirected to the service details page where you can see the new job and its appointments.
For **recurring services**, Probase pre-schedules the entire chain of future visits at once — from your start date through the end date (or one year out if you left it blank). For **one-time services**, a single appointment is created on the start date. See [How recurring visits are scheduled](/scheduling/future-visits) to learn how the visit chain works.
New appointments don't have a crew assigned yet (on single-crew teams they're assigned to your only crew automatically). Assign crews from the appointment detail page, the [Jobs without assigned crew](/scheduling/jobs-without-assigned-crew) list, or the calendar — and you can apply a crew to every future visit at once.
## Quick job creation shortcuts
The wizard skips steps automatically when you already have context:
**From a customer page:**
Clicking **New Job** from a customer's page automatically pre-fills the customer and skips the customer selection step, jumping directly to property selection.
**From a property page:**
Clicking **New Job** from a property's page automatically pre-fills both the customer and property, skipping those steps and taking you directly to the job details form.
These shortcuts happen automatically — no extra steps required.
## Billing type options
When creating a job, you'll choose how the customer is billed:
### Per Service billing
* Customer is charged each time an appointment is completed
* Best for one-time jobs or pay-per-visit arrangements
* Billing line items are created automatically after appointment completion
### Subscription billing
* Customer pays a flat rate on a schedule (weekly, monthly, or annual)
* Best for recurring flat-rate plans
* Choose the billing interval — the billing day is set automatically from the date you create the service
* Billing charges are created **automatically** on each upcoming billing date — Probase shows you the upcoming billing dates in the service details
See [Per-Service vs Subscription billing](/billing/one-time-vs-subscription) for a detailed comparison.
## What happens after creating a job
After you click **Create Job**, Probase automatically:
1. **Creates the customer** (if new) - Adds them to your customer list with all contact information
2. **Creates the property** (if new) - Links it to the customer with the full address
3. **Geocodes the property** - Places it on the map for accurate route planning and directions
4. **Creates the job service** - Sets up the job with "Active" status and all billing details
5. **Syncs with Stripe** (if connected) - Creates the customer in Stripe for payment processing
6. **Schedules the visits** - Creates the appointment on your start date and, for recurring services, pre-schedules the whole future chain through the end date (or one year out)
7. **Optimizes routes** (if enabled and a crew is assigned) - Automatically reorders the crew's appointments for efficiency
You're redirected to the service details page where you can:
* View all job details and appointments
* Assign crews and adjust the schedule
* Add notes or photos to the service
* Complete appointments and add service records
* Share payment links with the customer for billing
## Choosing between Jobs, Quotes, and Assessments
**Create a Job when:**
* Work is confirmed and doesn't need approval
* You know the pricing and scope
* Customer has already agreed to the service
* You're ready to schedule and start immediately
**Create a Quote when:**
* You can quote without visiting the property first
* Work needs customer approval before starting
* You want a formal acceptance workflow
* See [Creating quotes and assessments](/customers/creating-quotes)
**Create an Assessment when:**
* You need to visit the property before providing accurate pricing
* The scope is uncertain and needs evaluation
* You'll create a quote after the site visit
* See [Creating quotes and assessments](/customers/creating-quotes)
The workflow: Assessment → Quote → Job. But if work is already confirmed, skip straight to Job creation.
## Next steps
After creating jobs:
* [View your schedule](/scheduling/weekly-schedule) to see all appointments
* [Optimize routes](/routes/optimizing-routes) for efficient daily schedules
* [Complete appointments](/routes/completing-jobs) and track service records
* [Send payment links](/billing/sending-payment-links) to collect payment