Overview
Appointments are scheduled work visits for a service. You can create them from the service detail page or from the calendar.Create an appointment from a service
1
Go to the service
Navigate to Customers, click the customer name, click the property address, then click the service name.
2
Tap Schedule Appointment
For active jobs that don’t have an appointment yet, a Schedule Appointment button appears in the top-right of the service page header — on the breadcrumb row on a computer, and beside the ‹ back arrow on a phone.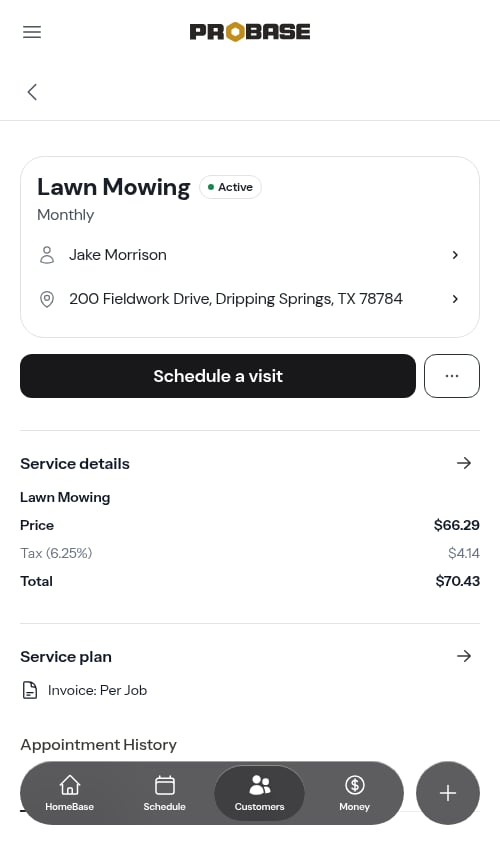
3
Fill in the appointment details
A modal opens with date and time fields: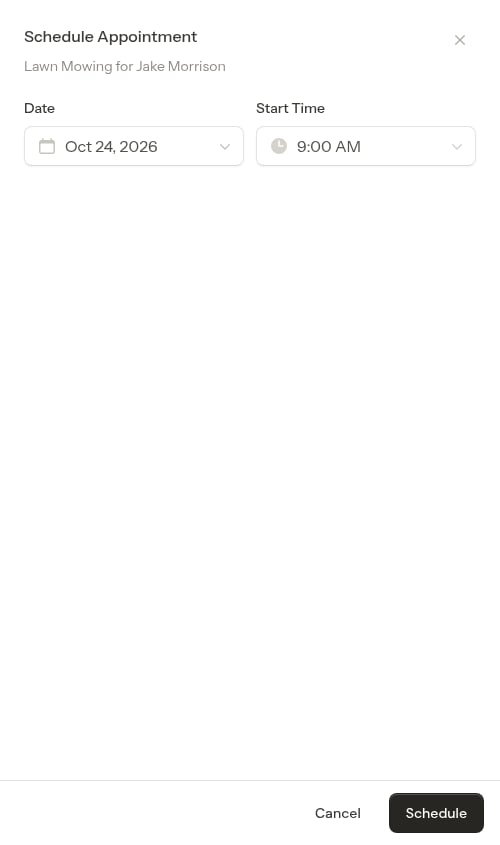
- Pick the Date
- Choose the Start Time — the end time is set automatically based on the previous appointment’s duration (defaults to 60 minutes if there’s no prior appointment)
- Optionally assign a Crew — if the service has a prior appointment, the same crew is pre-selected for you. The crew field only appears when you have more than one crew on your team.
4
Save the appointment
Click Schedule to schedule the visit. The appointment appears in the service’s history and on the calendar. The Schedule Appointment button is hidden once an upcoming appointment exists.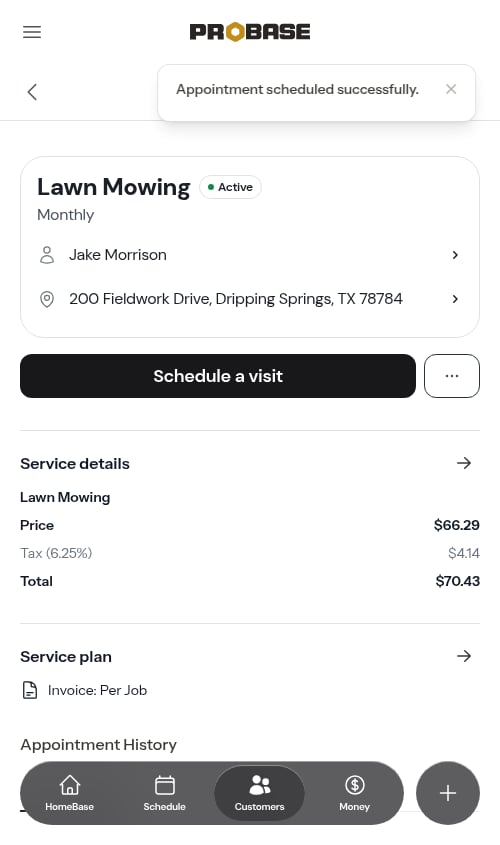
View appointments
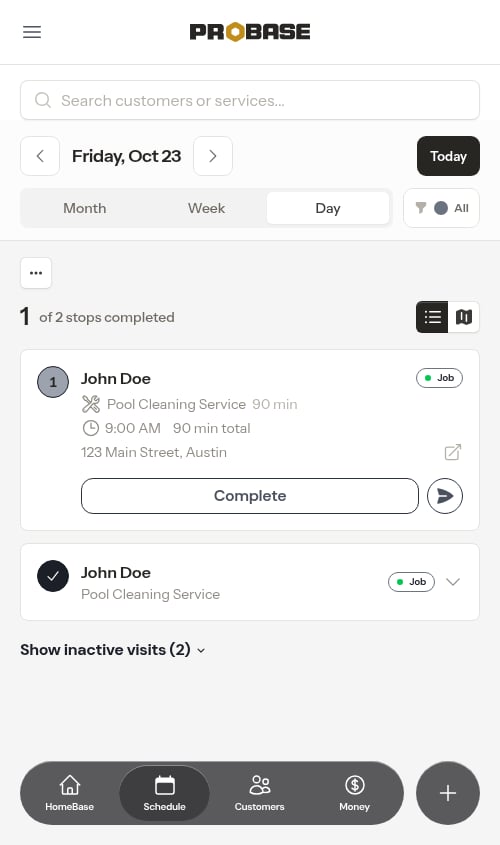
After creating appointments, you can view them:- On the service details page - Shows all appointments for that specific service
- On the calendar - Click Schedule in the sidebar to see all appointments across all customers
View appointment details
Click any appointment in the calendar or on a service page to open the visit page — the one screen your crew works the job from.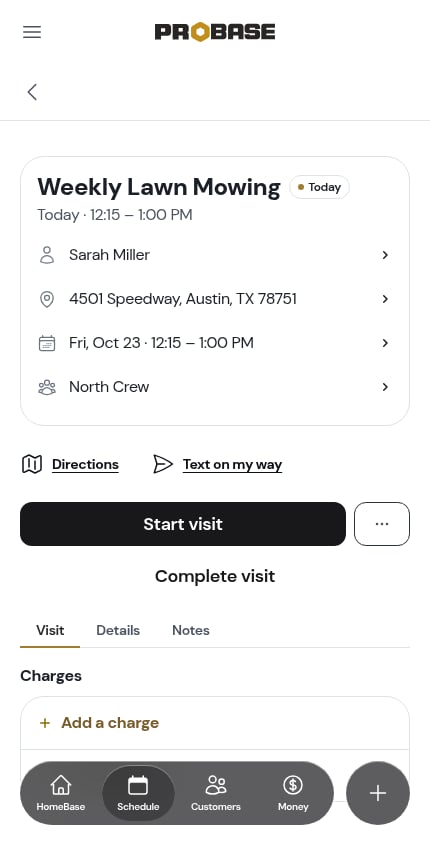
The address sheet
Tap the property row (the line with the map pin) on the header card and a sheet slides up from the bottom of the screen with everything you’d want to do with it: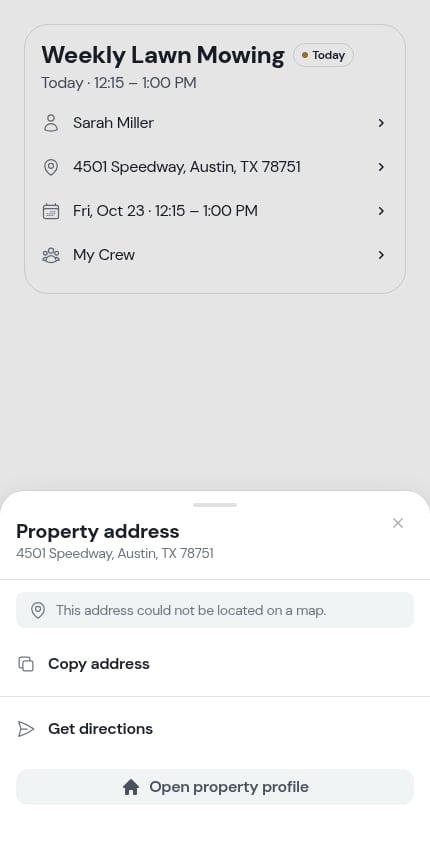
- A map preview — a satellite view of the property with a pin on it, so you can see the place before you drive there. It’s a picture, not a map you can pan or zoom. If ProBase couldn’t place the address on a map, a short note says so instead
- Copy address — puts the full address on your clipboard, ready to paste anywhere. An Address copied! confirmation appears
- Get directions — opens turn-by-turn directions in your chosen maps app
- Open property profile — jumps to the property page
The contact sheet
Tap the customer row (the line with the person icon) to open the contact sheet. It’s there on every visit, whatever its status — so you can still reach the customer about a job you finished this morning or one that got cancelled: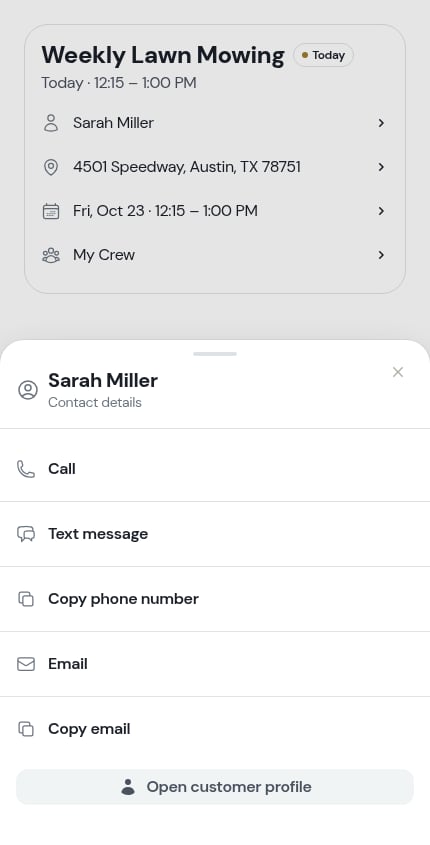
- Call — dials the customer
- Text message — opens your messaging app with their number filled in
- Copy phone number — puts the number on your clipboard
- Email — opens your email app addressed to them
- Copy email — puts the address on your clipboard
- Open customer profile — jumps to the customer page
If your role isn’t allowed to see customer contact details, the sheet says so rather than listing the actions — see Roles and permissions. On a marketplace job, there are no phone or email rows at all — the marketplace doesn’t share the customer’s contact details, so the sheet holds a short explanation and an Open Customer Profile on LawnStarter button instead.
Assign or change the crew
When your business runs more than one crew, the visit’s header card carries a crew row. Tap it to assign a crew (or swap to a different one) without leaving the visit.- If the visit already has a crew, the row shows that crew’s name.
- If no crew has been picked yet, it reads Not assigned to a crew yet.
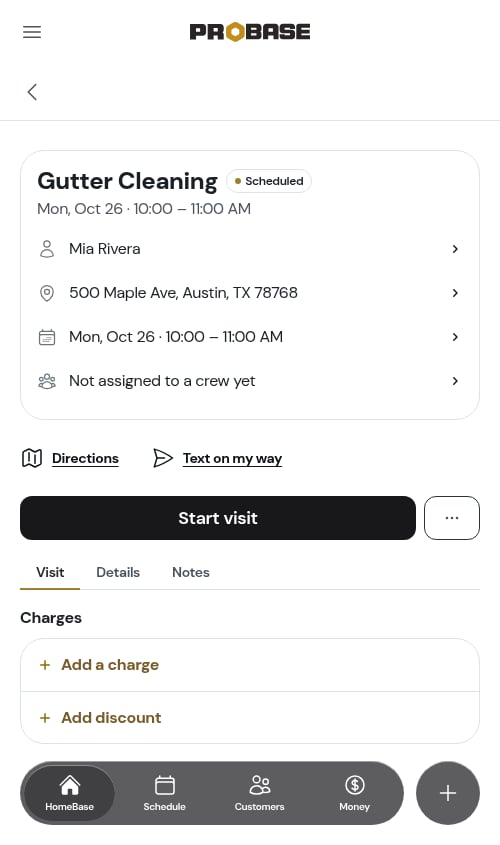
With a single crew there’s nothing to choose, so ProBase leaves the row out entirely — every visit belongs to that crew.
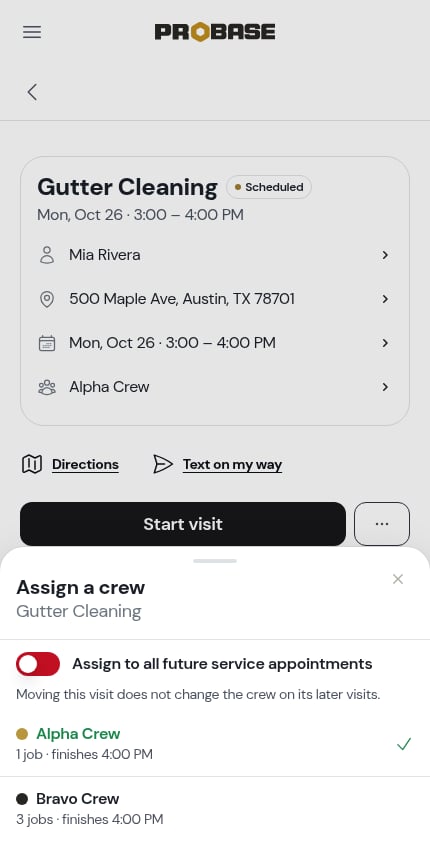
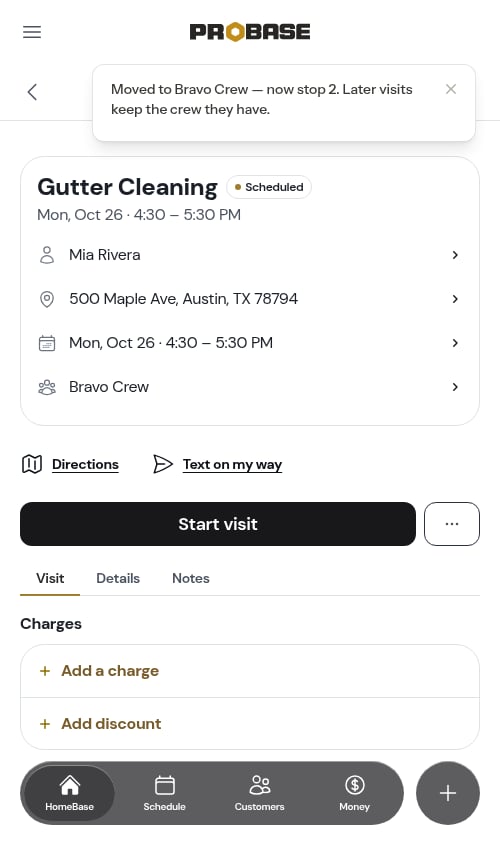
Every row on the header card works the same way: the whole row is the button, and a chevron at its right-hand end shows there’s something behind it. If your role isn’t allowed to assign crews, the crew row still shows who’s on the job but isn’t tappable — see Roles and permissions.
The Recommended crew, and what each crew costs you in driving
When your team has more than one crew, ProBase suggests which one to send — and shows its working, so you can disagree with it. A moment after the sheet opens, a Recommended badge appears next to one of the crews, and each crew ProBase was able to work out lands a short note on the right-hand side of its row saying how much extra driving that visit would add to that crew’s day:- +10m drive time — sending this crew adds about ten minutes of driving to their day
- +1h 15m drive time — an hour and a quarter more driving, so probably the wrong crew for this one
- No added drive time — it costs them nothing to take, because they’re already going right past it
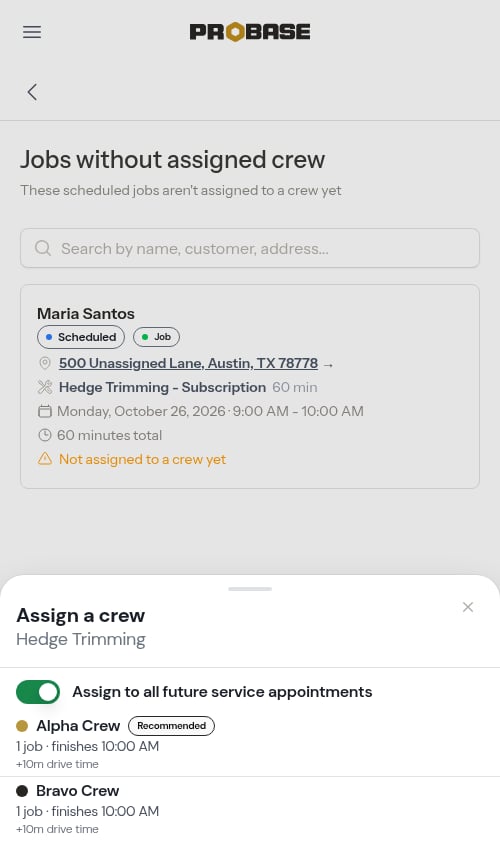
Working it out takes a second or two, because ProBase is planning a route for every crew. While it does, the service name at the top of the sheet is replaced by a small spinner and the line calculating drive time impact for crews; the service name comes back once the numbers land.You never have to wait for it. The crew rows and the all-future switch stay live while the spinner is going. Tap a crew mid-calculation and the assignment is saved right away, exactly as if the numbers had already arrived — ProBase just drops the half-finished comparison when the sheet closes.
If neither the badge nor the drive times ever appear, either they haven’t reached your account yet (they’re rolling out gradually), or ProBase couldn’t compare the crews this time — usually because the property’s address hasn’t been pinned to the map yet, or because there’s only one crew to choose from. Pick a crew as usual; nothing else changes.A single crew can also come up blank while the others show a figure: a crew with neither a starting nor an ending address saved has no day to plan around, so there’s nothing to measure. Add a starting address on the Crews page and it joins the comparison next time.
Assign one visit or every future visit
Recurring services pre-schedule the whole chain of future visits, so the sheet opens with an Assign to all future service appointments switch at the top. ProBase sets it for you based on what you’re doing, and you can flip it before you tap a crew:- Giving a crew to a visit that hasn’t got one — the switch is on, so the whole upcoming chain gets that crew at once and you only pick once.
- Moving a visit that already has a crew — the switch is off, because swapping one Tuesday’s crew shouldn’t re-crew the rest of the job. A line says so: “Moving this visit does not change the crew on its later visits.”
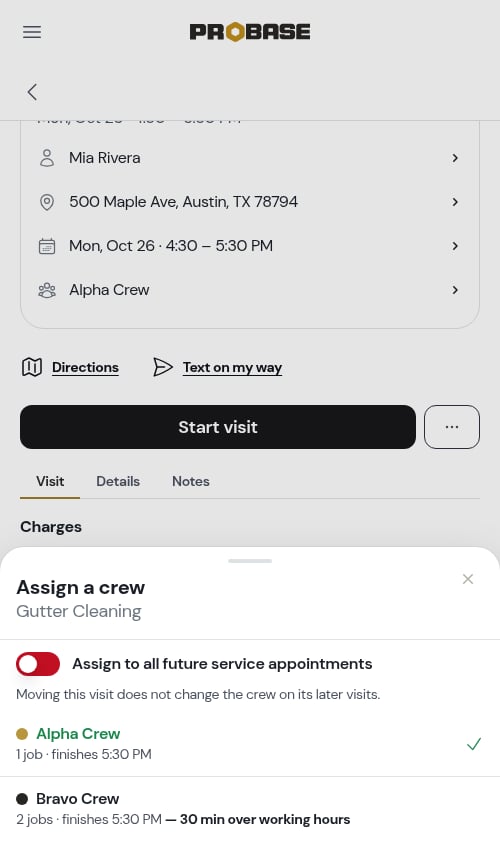
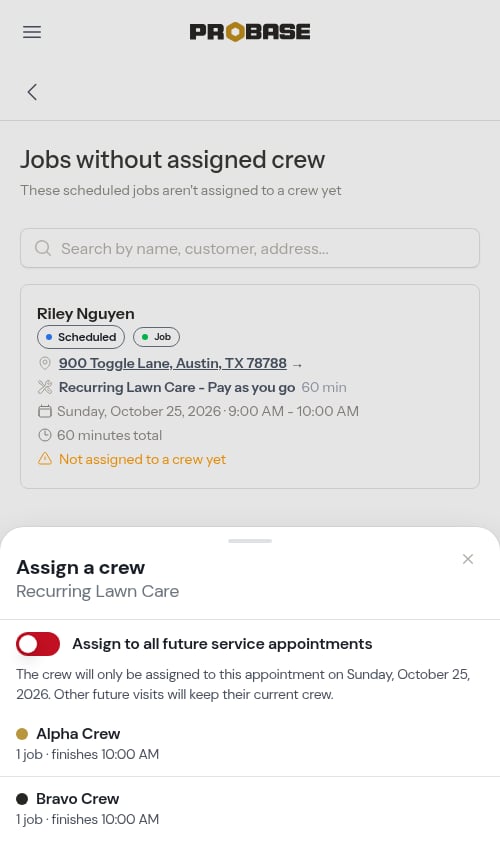
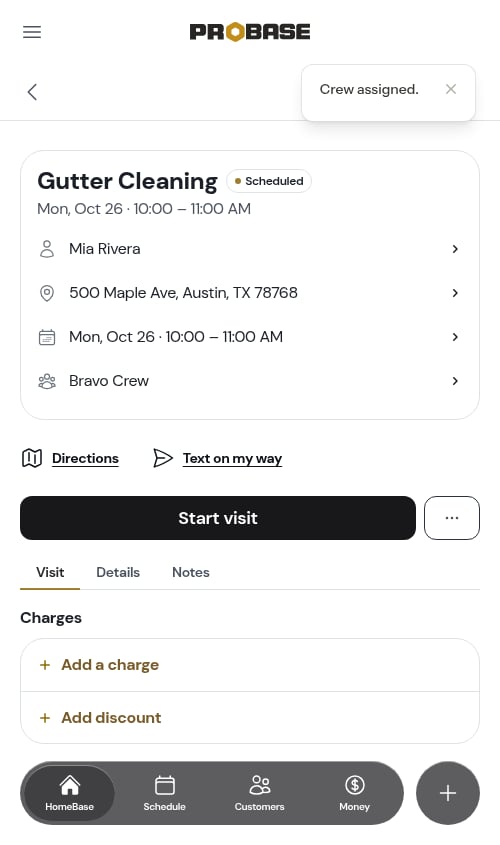
On a multi-crew business the crew row is on every scheduled visit — the fastest way to pick a crew for an overdue or unassigned job without going anywhere else.
Adjust the start time and length
The header card’s date-and-time row carries the visit’s day and time window — for example Tue, Aug 18 · 8:00 – 9:00 AM.1
Tap the date-and-time row and choose Change time
Tapping the row opens a short sheet offering Change time or Reschedule. Pick Change time and the Edit Time window opens, its title naming the day you’re working on — for example Edit Time on Tue, Aug 18 — with the service name underneath. This is a same-day adjustment: there’s no date to change here, only the time and how long the visit takes.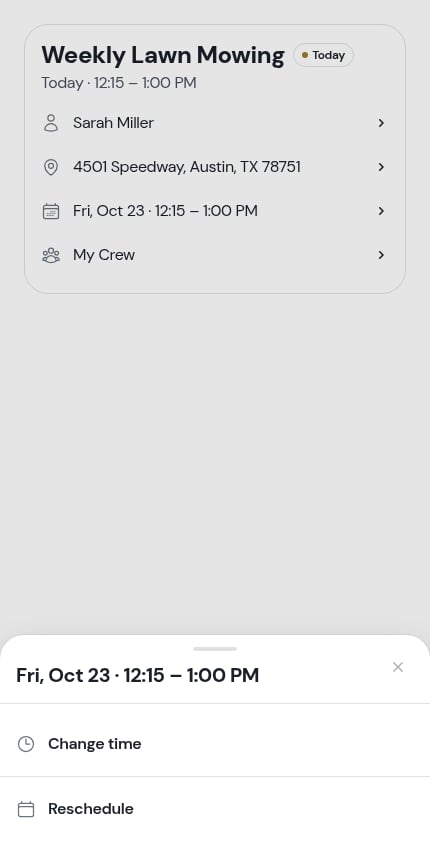
2
Set the new start time and duration
Pick the new Start Time and set the Duration, in minutes. Duration can be anything from 5 minutes to a full day.
3
Save
Tap Save. ProBase confirms with “Appointment time updated.” and the visit moves in your day and on the calendar.
To move a visit to a different day, choose Reschedule in that same sheet (it’s also in the ⋯ More sheet) — see Rescheduling appointments.
Seeing the rest of the day while you pick a time
So you’re not guessing at a time in the dark, the Edit Time window can show you the day you’re moving the visit into, right above the fields.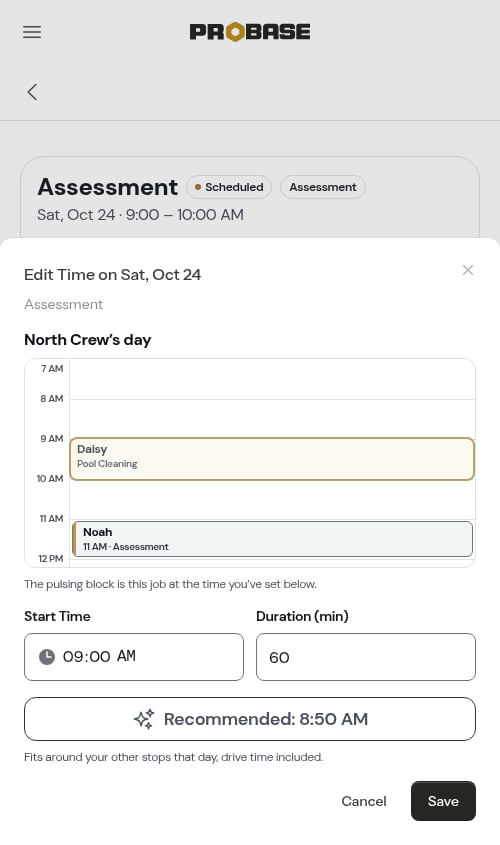
- The heading names whose day you’re looking at — for example North Crew’s day. If the visit doesn’t have a crew yet, the heading reads Crew schedules for this day and you get a labelled column per crew instead, plus an Unassigned column when there’s unassigned work that day, so you can see everyone at once.
- Every other stop on that day sits on the timeline in its own block, with the customer’s first name, the time, and the service.
- The pulsing block is the visit you’re editing, drawn at whatever start time and duration you’ve currently got in the fields. Change either one and the block moves and resizes as you type, so you can see the gap it lands in before you save.
- If nothing else is booked, a line reads No other jobs scheduled this day.
The window opens straight away and fills the timeline in a moment later — you’ll see a small spinner where the timeline will be while ProBase gathers that day’s stops. The Start Time and Duration fields are usable the whole time, so you never have to wait for the picture to load before setting a time.
The recommended start time
Under the fields, across the full width of the window, ProBase suggests a start time for the visit. It’s the last thing to arrive — the timeline fills in first, then the suggestion works itself out, so you’ll see Calculating optimal time… for a second or two before it becomes a button, for example Recommended: 7:40 AM. Tap the button and the Start Time field fills in with that time (the pulsing block jumps to match). Nothing is saved until you tap Save, and you’re free to ignore the suggestion entirely and pick your own time. The recommendation is the arrival time this visit would get if the crew drove its whole day in the most efficient order — the same route optimization behind Optimize drive — counted from the crew’s start time on the Crews page. If route planning can’t be worked out — usually because an address hasn’t been pinned to the map yet, or because the crew has neither a starting nor an ending address saved — ProBase falls back to the crew’s start time and labels it Suggested (crew start) so you know the difference. You may also see one of these instead of a suggestion:- Assign a crew to get a recommended start time. — the visit has no crew yet, so there’s no day to plan around. Assign one from the crew row and reopen Edit Time.
- Not enough location data to recommend a time. — ProBase couldn’t work out a route and the crew has no start time to fall back on. Usually the property’s address hasn’t been placed on the map, or the crew has neither a starting nor an ending address saved. Pick a time yourself; nothing else changes.
You get the same day timeline and recommended start time when you book a brand-new job: they sit on the Schedule step of the New Job wizard, so the first visit lands in a sensible gap too.
The briefing
Once there’s a note anywhere on that customer, property, service, or visit, a card headed What you need for this visit appears above the tabs with the key details in a few plain lines — gate codes, pet warnings, access notes, preferences — so the crew doesn’t have to hunt for them. It’s there only while the visit is still ahead of you. See The AI briefing. On a marketplace job the same card is built from the notes the marketplace sent, and those are read-only.The Details tab
Holds the facts about the job behind the visit: a Service card with the service name, the estimated duration, how often it repeats, how it’s billed, the price and tax, the job’s standing Charges and This visit’s own charges as a separate list; and a Property card with the address and property details. Tapping one of the This visit rows reopens that charge for editing — see Charges on a visit.Photos
Photos are taken on the visit’s Before photos and After photos checklist rows on the Visit tab, and stay there read-only once the visit is completed. Tap a tile to open the full-size image. See Notes and photos on a visit.Looking for the customer’s phone number or email? They live in the contact sheet — tap the customer row on the visit’s header card.
Next steps
- Reschedule appointments if plans change
- Complete appointments when work is done
- View the calendar to see all scheduled work